One-point perspective: draw a room with a window
Start with a rectangle for the back wall and one point for depth. Then add a window whose top and bottom aim towards that point while its sides stay vertical. This drawing exercise shows which lines should converge—and which should not.
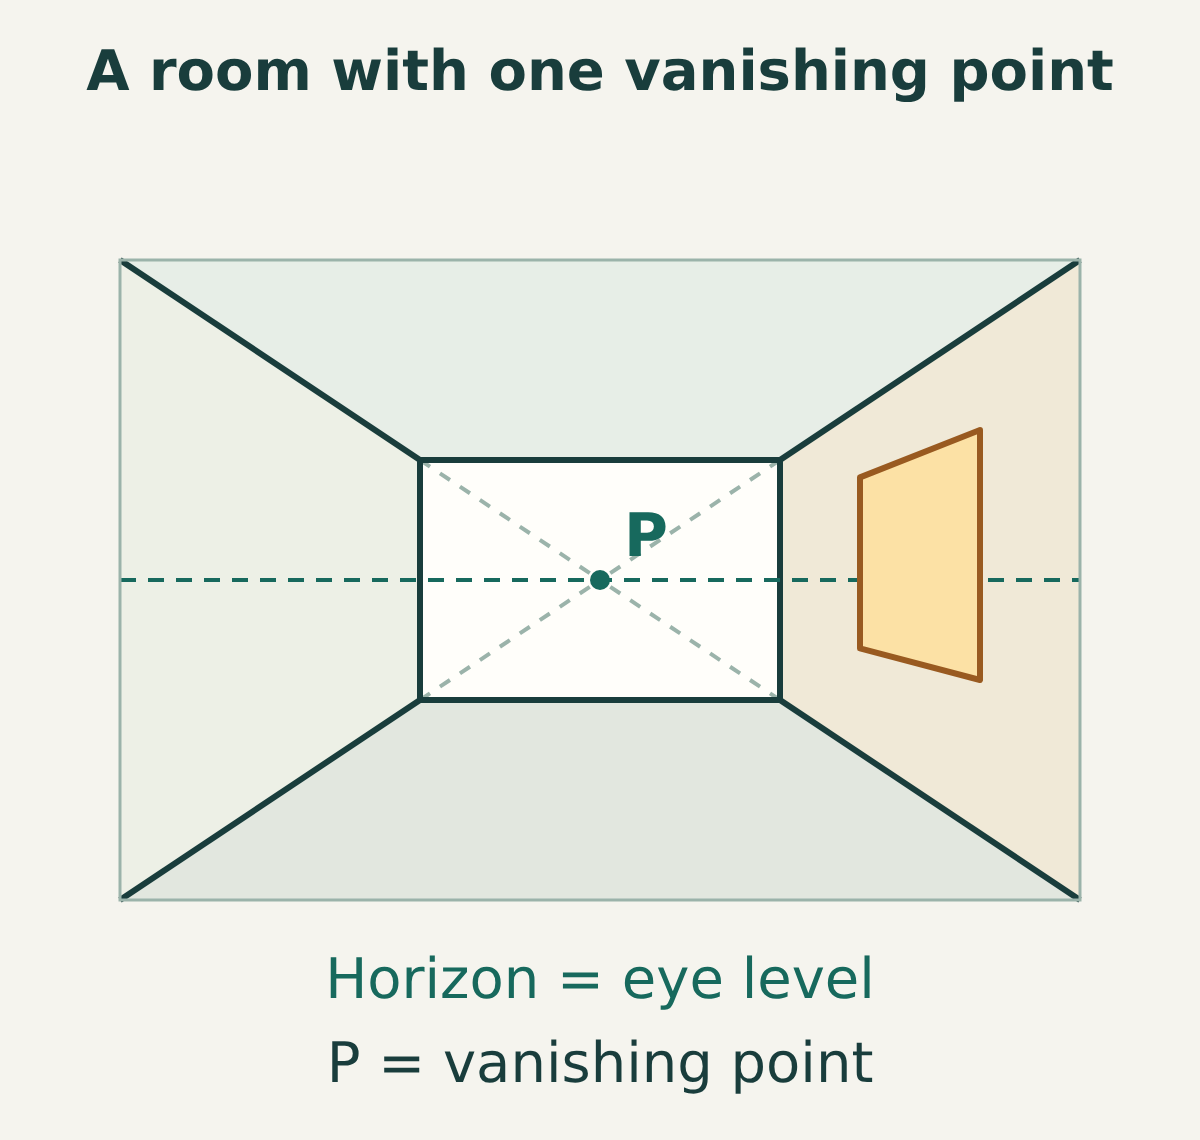
Set up a straight-on view
You need paper, a pencil, a ruler and an eraser. Use a landscape sheet or the practice PDF below. Leave room for two attempts; the second is where you change the viewpoint.
We will draw an imaginary rectangular room, looking straight towards its back wall with a level view—not looking up or down. The back wall faces us squarely. Keep the window aligned with the room. Tilted furniture and rotated objects are outside this first exercise.
The three line directions
In this view, the edges of the back wall stay horizontal or vertical. The wall–floor and wall–ceiling junctions that run away from you head towards a single vanishing point, P. Imagine extending those receding lines until they meet.
The horizontal guide through P is the horizon line, or eye level. It can run across an indoor wall even though no outdoor horizon is visible. It is a construction guide, not a stripe to draw on the finished wall.
Only the parallel edges running in this depth direction share P. Do not aim every line in the picture at it: vertical window sides still stand upright, and a picture hung flat on the back wall can remain a rectangle.
1. Place the back wall and eye level
Draw a large rectangular frame: this is the edge of your picture, not a front wall. Inside it, draw a smaller rectangle for the back wall, leaving space on all four sides. Keep its top and bottom horizontal and its sides vertical.
Lightly draw a horizontal guide through the smaller rectangle. Put P near the middle of that guide, inside the back wall. A centred point makes the first drawing easier to compare with the illustration; it does not have to be centred in every perspective drawing.
2. Connect the four room corners
Lay your ruler through P and one corner of the back wall. Draw lightly along that alignment, continuing beyond the corner, away from P, to the picture frame. Repeat for the other three corners.
Darken only the four segments between the back-wall corners and the frame, plus the outline of the back wall. These give you the ceiling, floor and two side walls. The guide segments inside the back wall can be erased later. In a different layout the extended lines may meet the frame edges rather than its corners; that is fine.
3. Build a window on the right wall
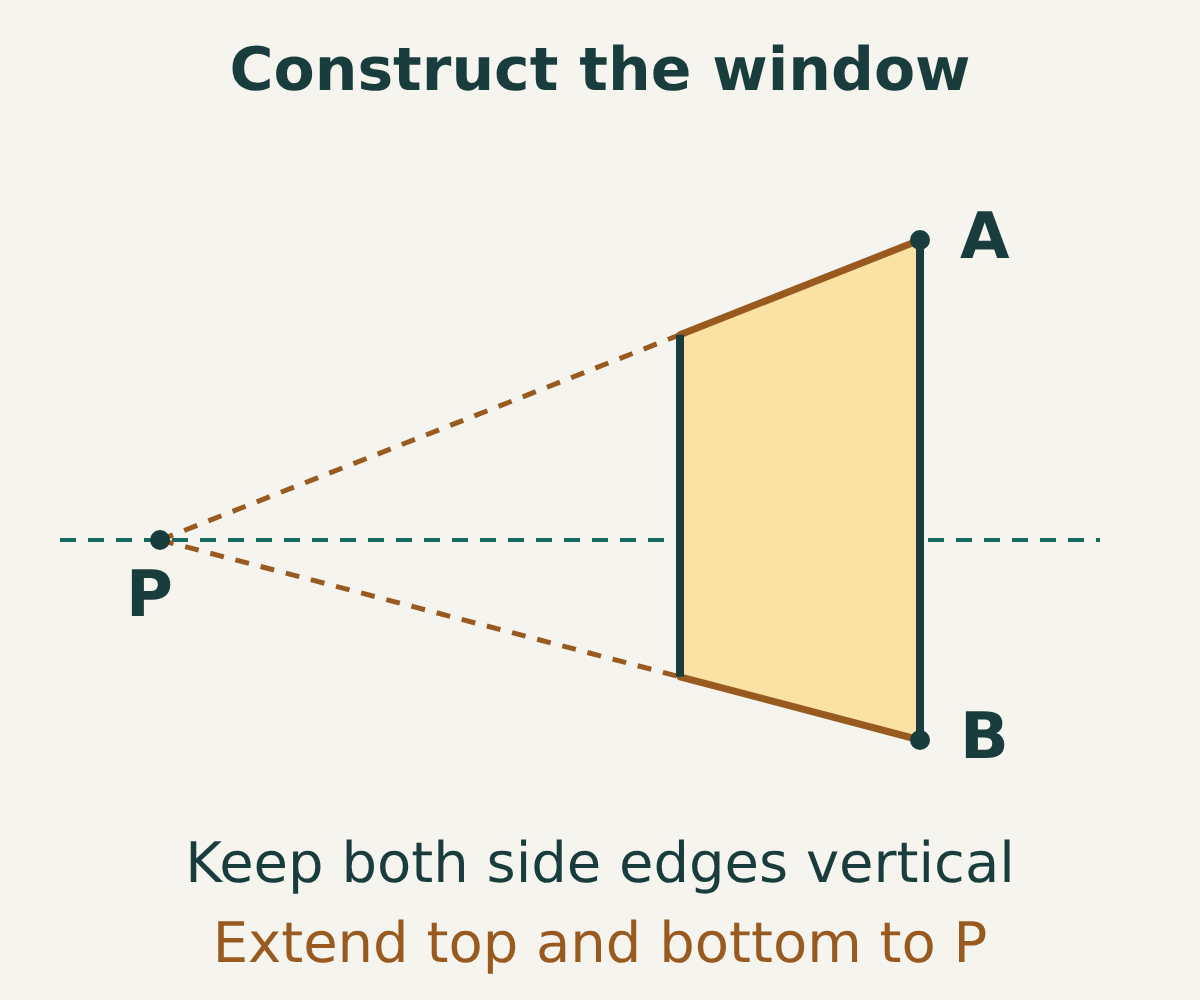
Draw a vertical segment fully inside the right-hand wall, nearer the outer picture edge than the back wall. Label its top A and bottom B. In our example A is above eye level and B is below it. This segment is the nearer side of the window.
Lightly join A to P and B to P. Between your first vertical segment and the back wall, draw a second vertical segment with its endpoints exactly on those two guides. This is the farther side of the window.
Darken the top and bottom edges between the two vertical sides. The farther side is shorter on the page. Erase the remaining guides after checking the construction. If you want window divisions, add another vertical between the top and bottom; a division running into depth must also aim towards P.
Why the window slopes this way
In this example the top of the window is above P, so it slopes down towards P as it recedes. The bottom is below P, so it slopes up towards P. The two edges do not have to be parallel on the page: they represent parallel edges in the room.
Do not memorise “tops always slope down”. If the whole window were above eye level, both depth edges would slope down towards P. Their relationship to eye level determines the slope.
Check these three mistakes before adding detail
- A window looks like a flat sticker: its top and bottom are horizontal on the side wall. Extend them lightly with a ruler. Rebuild them through P, keeping both sides vertical.
- The room looks twisted: a receding room corner or window edge misses P. Correct that line before shading; darker shading cannot fix inconsistent construction.
- The back wall looks pinched: its top or sides were also aimed at P. Restore the rectangle. In this straight-on view those edges stay horizontal or vertical.
Use the practice sheet for two attempts
The first frame gives you a back wall, eye-level guide and P. Extend the four corner alignments out to the frame, then construct the right-wall window. The second frame is blank: draw a new back wall and put eye level higher inside it, keeping P inside the wall. Rebuild every receding edge from the new P.
Compare the drawings. Moving the guide alone is not enough; the room corners and window guides must respond to the new point. Add one rectangular picture on the back wall as a final check that not every edge converges.
Print on A4 or Letter using Fit if needed; this sheet has no measured scale to preserve. You can also copy the two frames onto ordinary paper. The drawing method does not require the PDF.
Room perspective practice sheet (PDF, 1 page)
Two practice frames: guided construction and a new eye level. Print on A4 or Letter; Fit is fine.
A useful stopping point
Before decorating, extend the four room junctions and the window’s top and bottom with light pencil marks. They should meet P. Check that the back wall remains a rectangle and the window sides remain vertical. Then erase the construction lines you do not want to keep.
This is a practice construction, not a measured room plan. It teaches one family of parallel receding edges in a controlled view. A view towards a room corner, a tilted view or an independently rotated object needs a different construction. The sources below explain the perspective principles; the diagrams and practice sheet are original Coru exercises.