Negative-space drawing: start with the gaps
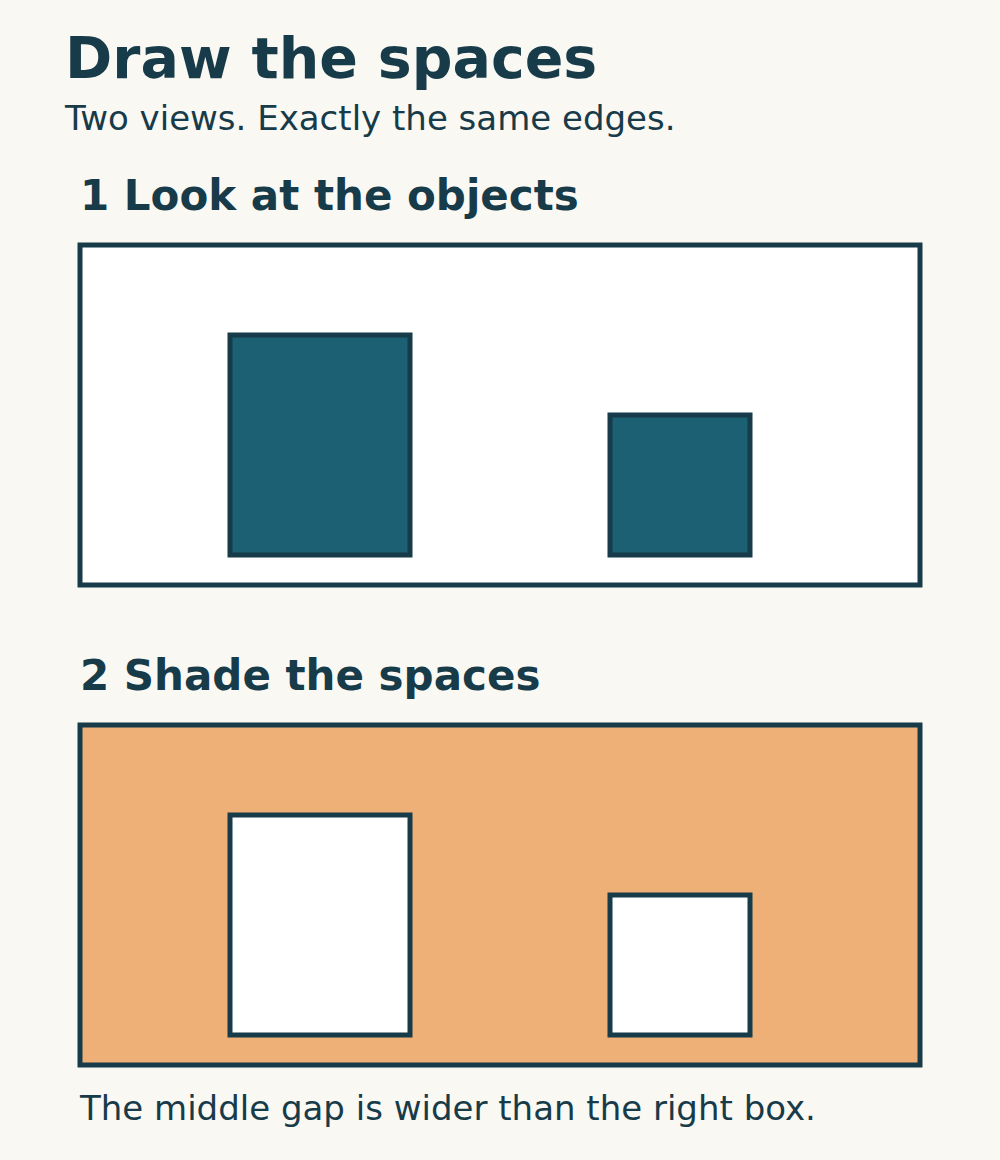
The gap between two objects has a shape of its own. Draw that shape and the surrounding background, and the objects appear as silhouettes. Try this three-part exercise with two simple boxes or the illustration below. You can use pencil shading or colour.
What counts as negative space?
In this exercise, the two objects are the positive space. The background around and between them is the negative space. Think of it as a shape you can draw, with corners, narrow parts and wide parts.
Negative space does not have to be white or left blank. You can shade it with pencil or fill it with colour. The distinction describes its relationship to the chosen subject, rather than the colour of the paper. The edge of an object is also an edge of the space beside it.
Read the two versions
The illustration shows the same two simplified box silhouettes twice. At the top, the objects are dark. Below, the surrounding space is orange and the objects are white. Their edges have not moved.
Find the gap between the boxes. It is wider than the right-hand box. Then compare the spaces above and below the boxes and the margins beside them. These are parts of one connected background; you can inspect them separately without drawing extra dividing lines.
1. Set a frame and three landmarks
Take paper, a pencil and two small opaque boxes of different heights. An eraser and coloured pencil are optional. You can use the illustration for your first attempt instead of setting up objects.
For your own arrangement, leave a visible gap between the boxes. Choose a plain sheet large enough to contain both silhouettes completely. Stand it upright behind the boxes and face it as squarely as you can, keeping its four corners visible. Use that sheet’s outer edges as the frame. Stay in the same seat while drawing; moving sideways changes the view.
Draw a small frame with roughly the same proportions. Lightly mark the top of each box and the bottom of one box. Compare those positions with the frame before adding any more lines. Leave out lettering, folds and surface decoration.
2. Follow the background boundary
Start at the taller box’s top corner and follow the edge where the background meets it. Look at each short stretch before drawing it: how long is it, and which way does it turn? Continue around the silhouette. Do the same for the second box.
As you work, describe the space: “a narrow strip beside this edge” or “a wide gap between these two corners”. A gap can open into the rest of the background; it does not need to be a separate enclosed hole.
Lightly shade the background inside the frame, leaving both object shapes unshaded. Use loose hatching if filling the whole area feels tedious. Ignore cast shadows for this exercise: follow the object boundaries, even where a shadow falls across the background.
3. Check one gap, then change the arrangement
Choose one comparison: the central gap against the narrower box, the space above the taller box, or a side margin. Look at the setup and your drawing in turn. Is that space relatively wider, narrower, taller or shorter in the drawing?
If you see a mismatch, adjust the relevant boundary lightly and compare again. One change is enough for this pass; you do not have to erase the whole drawing.
For a second small sketch, move one box farther from the other, keeping both silhouettes inside the frame. Keep the background sheet and your seat fixed. Before drawing, point to the spaces that changed. Draw and shade those spaces in a fresh frame. Keep both sketches to compare the two arrangements.
If the drawing gets confusing
- Everything looks too complicated: use plain boxes and compare their outer silhouettes. You can leave visible seams and edges between faces out of this exercise.
- The gap looks different each time you check: return to the same viewpoint and make sure neither object has shifted.
- You keep drawing symbols for boxes: pause and name one visible gap’s width, angle or corner before adding the next line.
- The background seems to be the main picture now: that is fine. In this exercise, “negative” names the space around the chosen objects; it does not mean unimportant.
About this exercise
Drawing surrounding space is an established approach. The Georgia O’Keeffe Museum explains positive and negative space; the National Gallery of Ireland explores gaps between objects; RISD Museum offers a negative-drawing prompt. Coru prepared this framed two-object exercise, comparison sequence and illustration.