How to draw a cast shadow: one box, one light
A cast shadow is a shape you can observe before you shade it. Use a small box and one light to find where that shape starts, which way it runs and how far it reaches. Then change only the light’s height and make a second sketch.
Two shadows, two places
On a plain box, the face turned away from the lamp is in form shadow. The darker shape on the table is a cast shadow: the box blocks light that would otherwise reach that part of the table.
Point to each one before drawing. Shading a side of the box does not automatically give you its shadow on the table. For this exercise, treat the table shadow as a separate shape with its own boundary.
1. Set up a shadow you can read
You need a small opaque box, a plain sheet for the table, a pencil, drawing paper and a movable LED lamp or torch. Choose an unpatterned, matte box. A shiny or transparent object adds complications to this first study.
Put the box flat on the sheet. Place the light to one side, higher than the box, and aim it so the whole box and shadow stay within the illuminated area. Reduce competing light until one shadow is easy to distinguish. Keep enough room light to draw comfortably.
Support the light securely. Sit where you can see both the box and its table shadow, and keep that viewpoint. Leave the box, sheet and light still during the first sketch.
2. Mark the shadow before filling it
Sketch the box lightly, leaving space for the shadow. Mark three things on your drawing: where the visible shadow meets the box’s base, its farthest visible point, and a conspicuous corner or bend along its boundary.
Compare distances with the box: does the shadow extend about half a box-width, one width, or more? These are estimates from your setup, not fixed proportions to copy. Follow the remaining boundary between your marks, checking its angles against what you see.
For a box sitting flat on the table, keep the visible shadow joined to the base where they meet. Do not insert a strip of white paper there. Leave out any part hidden behind the box; a drawing shows the visible view, not every edge of the shadow.
3. Add values without losing the shape
Lightly hatch the cast-shadow shape. Add a separate tone to the box’s unlit face, comparing it with the lit face. Keep the pencil marks simple enough that you can still change the outline.
Look for a particularly dark area near contact and for sharper or softer sections of the edge. Add only differences you can actually see. A cast shadow need not be uniformly black, and its entire boundary need not be equally sharp. Broad light sources can produce a gradual edge.
4. Raise the light and draw again
Keep the box, tabletop and your seat fixed. Raise the light vertically while keeping its horizontal position the same; keep it above the box and aimed at the setup. Before drawing, predict what will happen to the shadow’s reach.
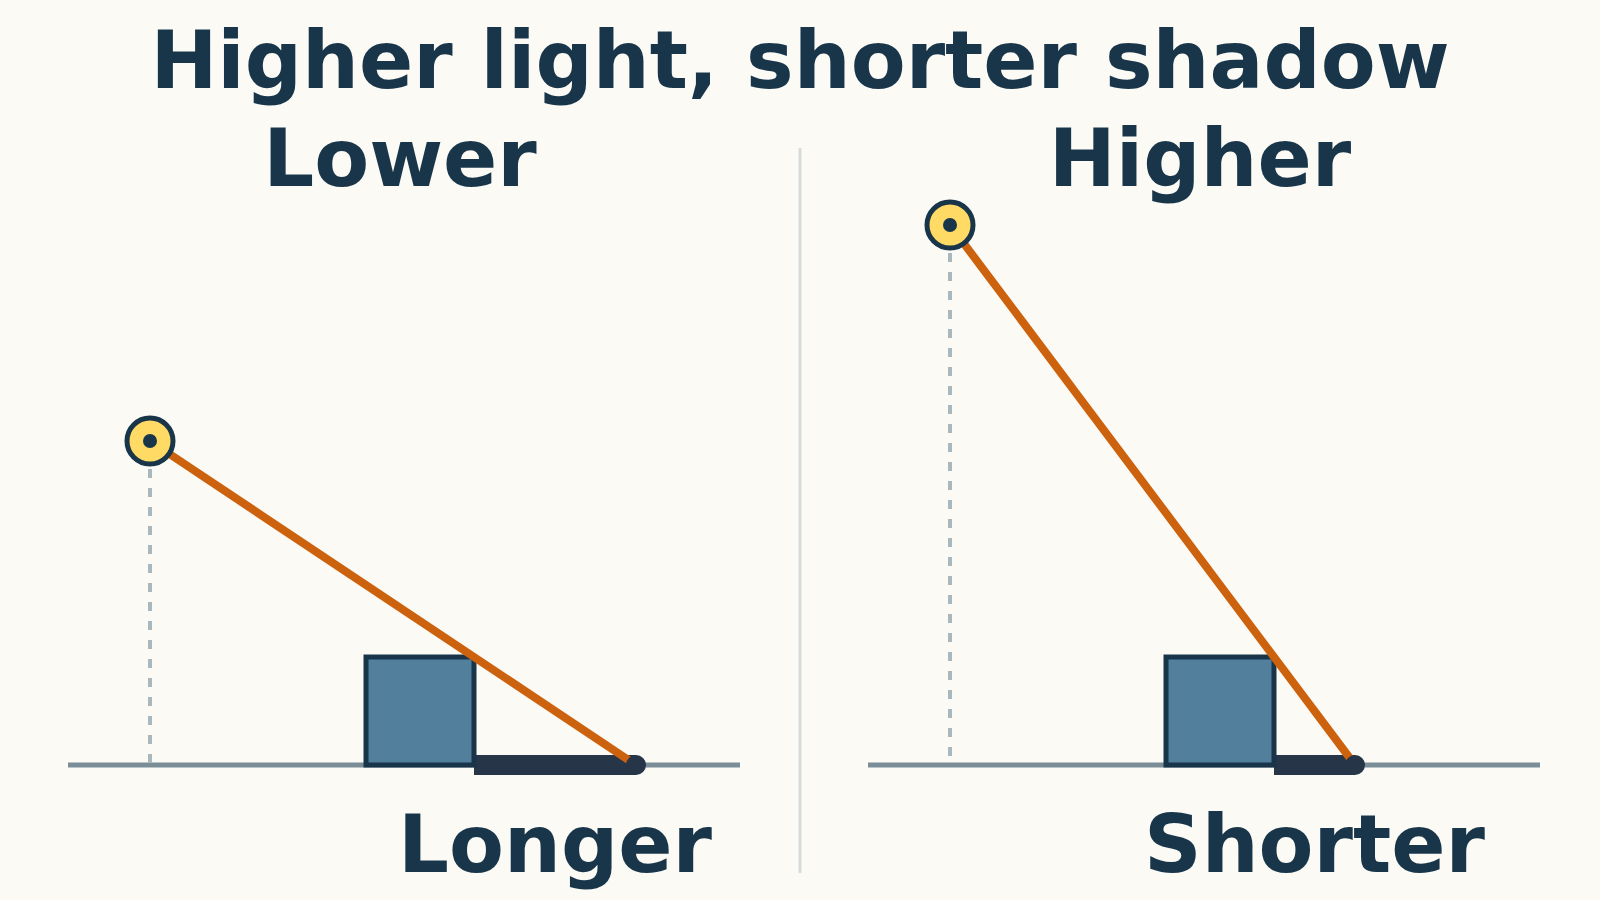
In the side-view point-source model shown here, the raised light makes a shorter shadow beyond the box. The ray grazing the upper far corner meets the table sooner. Real lamps have size, so your observed boundary may be softer than the diagram.
Make a second small sketch. Compare the two outlines first, then the shading. Write one observation beside them, such as “the far corner moved towards the box”. If the change is unclear, check whether the lamp also moved sideways or another light is contributing.
Predict the second sketch
The diagram keeps the box, table and the light’s horizontal position fixed. Raising a point light that is already above the box shortens the shadow beyond it; it does not switch the shadow to the lamp’s side.
Answers and explanations
- It becomes shorter.: Yes. The ray past the upper far corner reaches the table nearer the box.
- It becomes longer.: That happens when you lower this light, while keeping it above the box and holding its horizontal position fixed.
- It switches to the lamp’s side.: The light is still on the same side. The box still blocks light on the side beyond it.
When the drawing looks wrong
- The shadow heads towards the lamp: check the physical setup before adding tone. On the flat table it extends beyond the box, away from the light.
- The box seems detached from the table: inspect the visible contact and remove an invented gap. Do not darken the whole drawing to compensate.
- You draw a familiar oval: return to the observed boundary. A box’s shadow is not automatically an ellipse.
- The edge is doubled or indistinct: try a more compact light or reduce other lights. Some torches contain multiple LEDs; one lamp housing need not behave like one point source.
What the diagram explains
The illustration is an ideal side view of a box on a flat table. It explains shadow length when only light height changes. It does not provide the full outline seen from your drawing seat. Use observation for that outline.
Coru prepared this two-sketch exercise and diagram. The sources below support the distinction between shadow types, light blocking and ray diagrams. You can extend the practice by observing a different object, changing just that one part of the setup.