Checkmate or stalemate? Three positions, one small change
The kings stay on the same squares; only the queen moves. Decide whether Black is checkmated, stalemated or still able to play, then check every escape square.
Try the positions before opening the answers
In all three positions, it is Black’s turn. Black has only a king on a8. White has a king on c6 and a queen. There are no other pieces. The queen changes squares between positions; the kings stay where they are. These are separate positions, not consecutive moves in one game.
For each position, choose checkmate, stalemate or play can continue. Try to name a legal move before opening the explanation. You can use the text descriptions, the diagrams or a board of your own.
Coordinates use a–h from left to right and 1–8 from bottom to top in these diagrams. The corner a8 is at the top left. Every answer panel starts closed.
The rules you need
The queen moves along a row, a column or a diagonal, without jumping over pieces. In these positions a king moves one square in any direction, but cannot move onto a square attacked by an enemy piece. A king also attacks each neighbouring square, so two kings cannot stand next to one another.
Check means the king is under attack. You must answer a check with a legal move that removes that attack; you do not capture the opposing king.
- Checkmate: the player to move is in check and has no legal move. That player loses.
- Stalemate: the player to move is not in check and has no legal move. The game is a draw.
- For these three exercises, a legal move means play can continue. A trapped-looking king alone is not enough to decide the result.
1. White queen on b7
White: king c6, queen b7. Black: king a8. Black to move.
First check whether the queen attacks a8. Then examine a7, b7 and b8: these are the only squares next to the black king that lie on the board. If you consider capturing the queen, check who protects her.
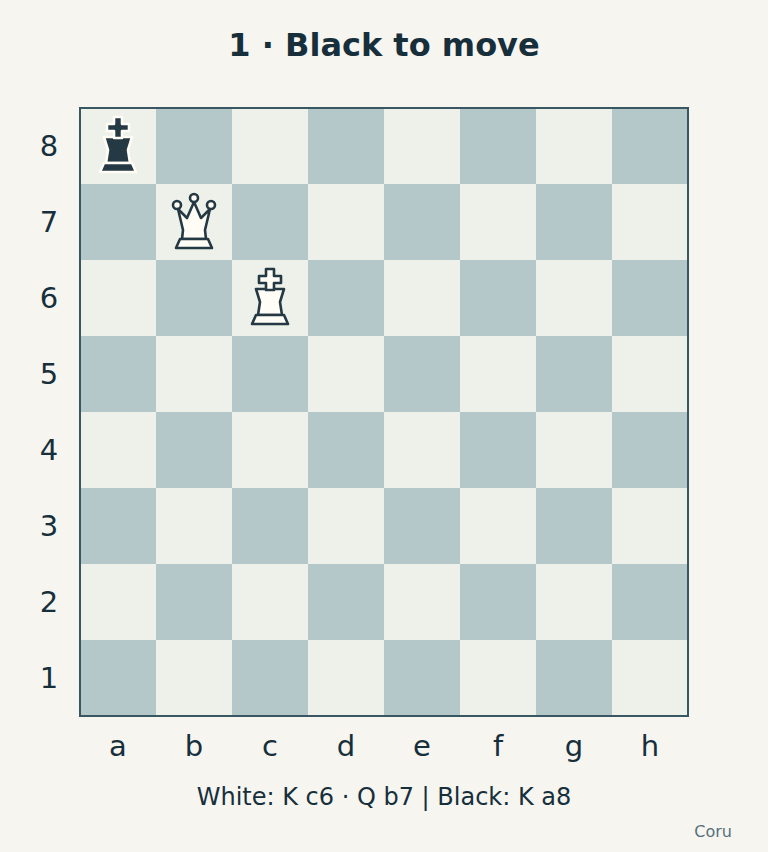
Check Position 1
Choose an answer, or open “Answers and explanations” below. All explanations are available without JavaScript.
Answers and explanations
- Checkmate: White wins: Correct: checkmate. The queen on b7 attacks a8 diagonally, so Black is in check. The queen also attacks a7 along the row and b8 along the column. Capturing the queen on b7 is illegal because the white king on c6 protects b7. Black has no other piece to move, so there is no legal reply.
- Stalemate: a draw: Stalemate requires the king not to be in check. Here the queen on b7 attacks a8 diagonally, and Black has no legal escape: this is checkmate.
- Play can continue: No legal move is available. The queen covers a7 and b8; the white king protects the queen on b7. Black is already in check on a8, so the game ends in checkmate.
2. White queen on b6
White: king c6, queen b6. Black: king a8. Black to move.
Only the queen has changed square. Check a8 again instead of carrying over your previous answer. Then check the same three neighbouring squares: a7, b7 and b8.
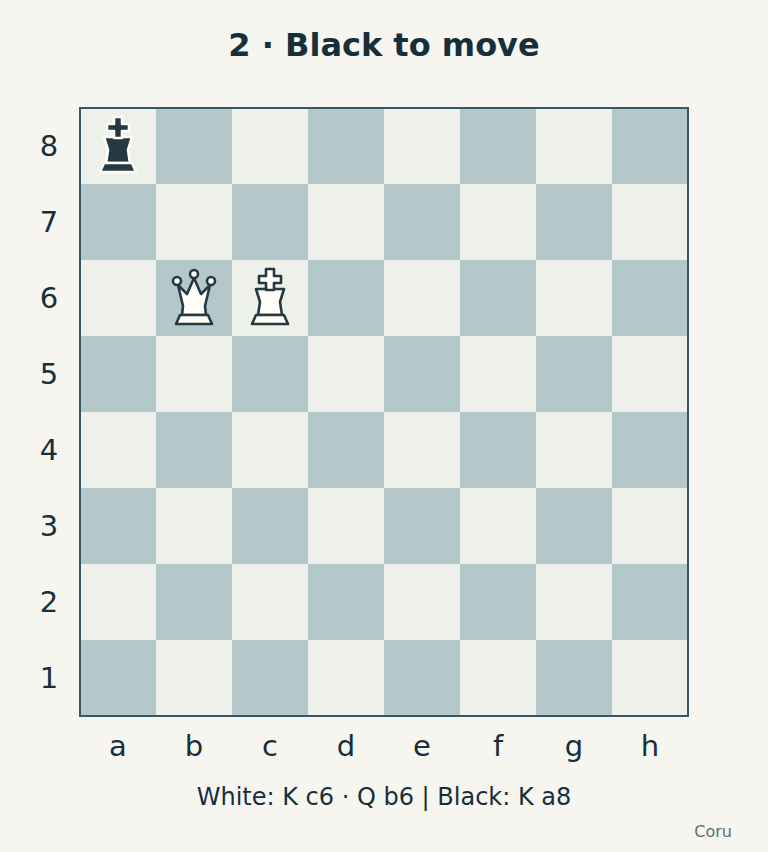
Check Position 2
Choose an answer, or open “Answers and explanations” below. All explanations are available without JavaScript.
Answers and explanations
- Checkmate: White wins: Checkmate requires a check. The queen on b6 does not attack a8: those squares share neither a row nor a column nor a diagonal. With no legal move but no check, the result is stalemate.
- Stalemate: a draw: Correct: stalemate. Neither white piece attacks a8. The queen on b6 attacks a7 diagonally and b7 and b8 along the b-file. The white king also protects b7. Black has no legal move, but is not in check, so the game is a draw.
- Play can continue: A king cannot pass a turn. Here a7, b7 and b8 are all attacked, and Black has no other piece to move. Because a8 itself is not attacked, this is stalemate.
3. White queen on b5
White: king c6, queen b5. Black: king a8. Black to move.
The queen has moved down one more square. Test a8, a7, b7 and b8 afresh. If you think play can continue, name the square the black king can legally reach.
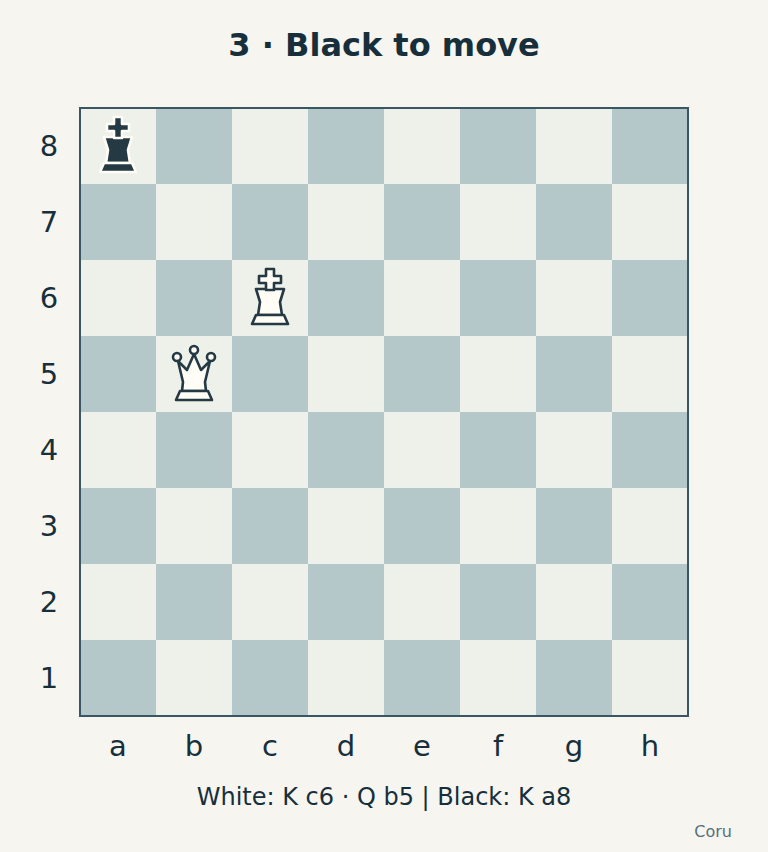
Check Position 3
Choose an answer, or open “Answers and explanations” below. All explanations are available without JavaScript.
Answers and explanations
- Checkmate: White wins: The king on a8 is not in check, and a7 is a safe destination. Neither white piece attacks a7. This is not checkmate.
- Stalemate: a draw: Stalemate requires no legal move. Here the black king can move from a8 to a7, so the game can continue.
- Play can continue: Correct: the king can move from a8 to a7. That square is attacked by neither the queen on b5 nor the king on c6. The queen still attacks b7 and b8 along the b-file; the white king also attacks b7. Thus a7 is Black’s only legal move in this position.
A two-question check for your next game
Ask: “Is the player to move in check?” Then: “Does that player have any legal move?” If there is no legal move, the first answer separates checkmate from stalemate.
In a larger position, check every piece, not just the king. A player in check might capture the checking piece or block a rook, bishop or queen’s line of attack. A player whose king has no safe move might still be able to move a pawn or another piece.
When deciding whether a capture is legal, imagine the board after the captured piece has been removed. If your king would still be attacked, the capture is not an escape.
To practise with someone else, take turns saying which square you checked and which piece attacks it. There is no timer: the explanation matters more than guessing the label.
About this comparison
These are ordinary king-and-queen endgame positions, arranged as a comparison for Coru. The lesson, questions and explanations were written for this page; the chess rules and familiar positions are not claimed as new inventions.
The FIDE reference below gives the underlying rules. You can reproduce every position from its three listed pieces and the instruction “Black to move”.